Internet Explorer in your Firefox Tab: IE Tab

I've been a Firefox fan since the early versions of this wonderful browser, and while I absolutely love most of its features, what it really lacked all the time is a set of Internet Explorer-only features some really stubborn websites still require. I found my way around most of such limitations, but after I joined my current company I had to suddenly start using lots of ActiveX-powered websites, and this meant having a whole set of pages I would browse in IE only…

Well, not anymore! Meet IE Tab – a wonderful Firefox extension which allows you to transparently open IE-only websites in a separate tab of your browser. All you do is maintain a list of websites which will always be rendered using the IE engine and not the Firefox one, and that's it. This list is accessible from the IE Tab options menu. I dare you – go on and give it a try: IE Tab.
Google AdSense: How To Show Search Results On Your Own Page

While opening Google AdSense search results  within your own site is definitely not new, I haven't seen any quick review explaining how it all works and what's required to set it up. Working on enabling this AdSense feature for my Personal Development blog, I figured someone else could find this post useful.


Introduction

Why would you want to show Google search results on your own page? To make sure your visitors enjoy the same interface the rest of your website has, of course. To ensure the design integration makes visitors feel as if they're browsing just another one of your pages.

Everyone who had used Google AdSense for search feature in the past, must remember that you had only an option to change some basic colors for the results block, and it would be opened from Google's website and usually look very different from the rest of your website.

Well, now we have an option to change this.


How it works 

The idea behind showing your Google search results on your own site is pretty simple. You've got to set up a designated search results page on your site. You're free to change any design feature of this page to make sure it looks as good as any other page of your website, but space for the Google search results must be reserved.

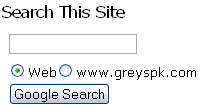
Instead of one piece of Google AdSense code, you're going to get two. The first piece of code is the one creating a Google search form for your website. Something which will look like this:


Google AdSense search form


The second piece of code is for your results page. Just copy & paste the search results code from your Google Adsense to your search results page,  and you're done. If you open such a page manually, without being called by Google AdSense search form, you will see no search results, but if the page is shown as the result of an actual search using the Google search form on your website, you will see a neat page with all the results found and nicely integrated in your design.


Step-by-step instructions

I don't intend this page to be a full manual on the Google AdSense search results integration by any means, but all the steps shown before will hopefully show you how easy the whole procedure is. 


1) Google AdSense account – you must have a valid AdSense account to begin with. If you still haven't got one, it's not too late to get one – you will find all the details in my Getting Started with Google AdSense article.


2) Find out the URL of your future results page 

You need to know where you results page is going to be found, because you will be asked for this URL in during AdSense for search setup.

For WordPress-based blog, it is fairly simple to specify the exact name of your page and therefore know the full URL for this page without even creating it (you can't created it yet, read on to find out why)


3) AdSense for search setup 

Log into your AdSense account, open the AdSense Setup tab,  click the AdSense for search, and configure your Google AdSense search in a way similar to this:

  • Search Type section – this is where you decide what kind of search you would like to provide your visitors with. Most likely, you will opt for a Google WebSearch + SiteSearch, as it allows both global and local (your domain-specific) searches.

    Click the radio button for the desired option, and if you opted for the SiteSearch option, type your website's URL in the form provided.

  • Search box style section – this dialog allows you configure the way your Google search form will look on your website
  • More options section is the one where you need to choose the preferred way of  Opening of search results page. If you click the  Open results within my own site radio button there, you will be prompted for a URL of your search results page from Step 2 of this how-to.

Complete all the rest options like you normally would, and the last step of your AdSense for search setup will be the two pieces of code I have mentioned before, ready for you to copy and paste into your website pages. 


4) Create a designated search results page for your website

Now that you have the necessary pieces of code in your AdSense setup window, would be a good time to create the results page of yours.

If you're a blogger, then you need to create a static page of some kind and make it look the same way you'd like it to be, leaving space to be populated with search results. 

If your blog is WordPress-based, you will need to create a page template, and then create a new page based on this template. You can find all the necessary information on working with Pages in WordPress on the Pages section of official WordPress documentation site. 

Essentially, a page template in WordPress is nothing but an PHP/HTML file you create in your WordPress theme directory. Take one of the existing page templates to start off, and make sure you paste the second piece of AdSense search code  into this page template where you would like to see your search results.


5) Update your website to include the latest AdSense code for the search form. This is where you decide what page of your website (or pages if it's your blog – cause many bloggers put search forms in the sidebar code, so that the search form is shown on practically every page of their blog.


That's all, you're done. Enjoy your new Google AdSense search results page!

If you're looking for a working example, please visit my Personal Development blog, and use the search form found on the right  sidebar. If you want to compare my search results page to the same page opened manually, you can always open the search results page yourself (like I mentioned before, you will obviously see no results in this case).

Let me know if you need help with getting this AdSense feature working on your website – just a leave a comment for this post, and I'll be sure to contact you using the email provided.

Also, I think you would benefit from reading the official AdSense support article on the same topic: How do I implement Adsense for search results on my own page?
 

Archives page added

I've just added a PerfectBlogger Archives page, where you'll be able to find every post I've made on this blog.


Archives page is one of the basic pages each blog should have. Not only does it help your visitors navigate around your older posts, but it also servers SEO purposes: it helps search engines get to each of your pages with content the quickest way.

If your WordPress theme doesn't come with a built-in archives feature, or if you don't like it for some reason, I strongly suggest you download and install the SmartArchives plugin by Justin Blanton

Glossary Updates in the left menu

A very quick update today: just like I promised a few days ago, I've added a Glossary Updates section to the left menu, it now shows the 10 most recently added or updated Blogging Glossary articles, and also shows you the total number of definitions found in the glossary. 

3 Ways to Make Old Extensions Compatible with Firefox 2.0

Digg This Story!

WELCOME, dear visitors! I would like to thank you for stopping by. Should you find this article useful, please share the link to my website with anyone who you think will benefit by reading it and subscribe to my RSS feed. THANKS!

So, I’ve had some more time to play with the latest build of Firefox, and I liked it so much that I couldn’t use the 1.5 version anymore. And this left me with a problem: hardly any of my extensions were compatible with the latest and greatest Firefox version.

I’ve made a bit of a research out of it, and here we are: I present you with the 3 ways to make extensions compatible with Firefox 2.0.

Firefox Books

If you like Firefox, you will find the following books extremely useful:

First though, I’d like to give you a few warnings:

  • not 100% of your extensions will work,some of the older ones would really be incompatible. But if you had Firefox 1.5, than I doubt you’ll have any problems.
  • if you update any of the “made compatible” extensions using the automatic update function of Firefox, you may easily end up with an incompatible version again. This means you’ll probably have to make it compatible once more.

That said, I hope you will find useful at least one of the following ways to make old extensions Firefox 2.0 compatible. I’ve also given you the main advantage and disadvantage of using each of the methods.

1) Making Extensions Compatible – THE EASY WAY

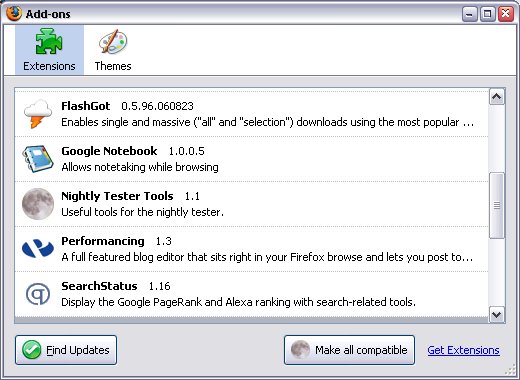
All you have to do is to go and download a wonderful Nightly Tester Tools extension. Not only it is compatible with your newest Firefox version, but it will also add a button to your Extensions manager (Tools->Add-ons):

Just click this button and restart your browser. Please note that this is a screenshot taken AFTER making all the xtensions compatible – so as you can see they’re all active already.

The advantage of this way is that it’s really easy to make all your extensions compatible with any Firefox until Firefox 3.0 (that’s what this extension puts as the MaxVersion for each of the extensions it fixes)

The disadvantage is that there is no equally easy way to revert the changes, so once “made compatible”, your extensions will stay this way – there is no button to make them uncompatible again. However, disabling the extension seems to restore the versions.

2) Making Extensions Compatible – THE FIREFOX GURU WAY

What you can do is open the configuration (about:config) in your Firefox browser, right click the list and create a boolean extensions.checkCompatibility option there. Set its value to false and restart the browser.

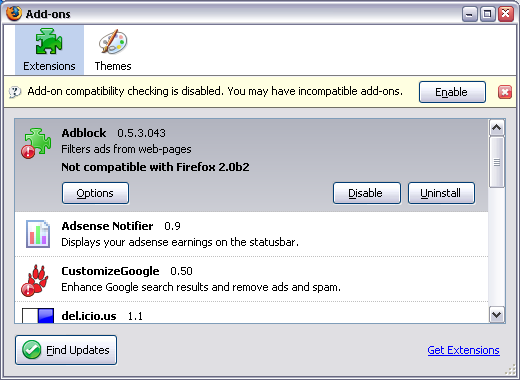
Most of your extensions should work now. If you go to the Add-ons dialog, it will look like this:

As you can see, extensions which would otherwise be incompatible, are flagged with the exclamation mark. You can also see a warning message which suggest you enable the compatibility check again.

The advantage of this approach is that it’s really simple to make the change which affects all the extensions.

The disadvantage is that this way can be used as a temporary solution only, as it may lead to unpredictable consequences (some really old or really new extensions may malfunction).

3) Making Extensions Compatible – THE HARD WAY

This is essentially a manual way of accomplishing the result of using the Nightly Tester Tools extension.

The advantage of this way is in total control over which extensions you’ll hack to become compatible.

The disadvantage is in the fact that every step of this method is rather hard: distinguishing extensions to make sure you’re changing the one you really want, and
manually changing the versions supported.

  1. Close your browser
  2. Go to the folder with all your Firefox extensions:
    C:\Documents and Settings\USER\Application Data\Mozilla\Firefox\Profiles\PROFILE\extensions In this line, USER is to be replaced with your Windows login, and PROFILE will be the name of your Firefox profile (weird looking folder name, usually the only one found in Profiles folder)
  3. You’ll see a list of folders there, 1 folder for each extension. The names of the folders are the unique identifiers for extensions, so they may seem scary at first:
    {34274bf4-1d97-a289-e984-17e546307e4f} – this is the Adblock extension GUID.
  4. Go to any folder, and open the install.rdf file for editing with your favorite clear text editor. Notepad works, but using it will make things even harder cause it doesn’t part rdf files properly. Your choice :) Now back to the business. You need to look for 2 things:
    • name of the extension, to make sure you’re editing the right oneJust look for the em:name, and try to recognize the extension from the description that follows:

      <!– Front End MetaData –>
      <em:name>Adblock</em:name>
      <em:description>Filters ads from web-pages</em:description>
      <em:creator>The Adblock Crew</em:creator>
      <em:contributor>Henrik Aasted Sorensen</em:contributor>

    • a block of minimal and maximum Firefox versions the extension will work on.
      Warning: there could be few similar blocks with versions, so make sure you’ll edit the one which has EXACTLY this em:id, the one which belongs to Firefox browser: ec8030f7-c20a-464f-9b0e-13a3a9e97384.
    • <!– FireFox –>
      <em:targetApplication>
      <Description>
      <em:id>{ec8030f7-c20a-464f-9b0e-13a3a9e97384}</em:id>
      <em:minVersion>0.7</em:minVersion>
      <em:maxVersion>1.5</em:maxVersion>
      </Description>
      </em:targetApplication>

  5. Edit the maxVersion parameter (shown in bold to make it easier), and change it from 1.5 to 2.0b2.
  6. Remove the extensions.cache file from the C:\Documents and Settings\USER\Application Data\Mozilla\Firefox\Profiles\PROFILE\ folder – this will make sure Firefox will read all the changes from install.rdf files and pick up the now “compatible” extension
  7. Restart your browser, enable the previously disabled extension you’ve just edited
  8. Restart your browser again to activate this extension

There you have it. Enjoy!

Firefox 2 Beta 2

At last, the second beta of Firefox 2 is finally released and available for download! I saw the first beta before but it wasn't stable enough, so this time around I'm hoping to give it a try again. Below is a list of things I really like and don't like about Firefox 2.


What I like about Firefox 2 

  • Built-in spell-checker – not only do you have your typos highlighted as you enter your text, but you can always right-click on any text field and spell-check it again to see all the suspicious words. I've been waiting for this, and had to keep Google Toolbar for this purpose.

  • Close button for each tab – again, you can't imagine how useful and effort saving this option is – you don't have to scroll to the right side of the Firefox window to close the currently open tab anymore

  • JavaScript 1.7 support – I don't really plan on using the latest and greatest features, but there's definitely been some work done in JavaScript space, as one particular plug-in for WordPress which is partially written in JavaScript finally started working properly, while in previous versions of Firefox it would not properly show some of the windows

  • Phishing protection – mostly I can tell a phishing site apart from the original one, but you can't be too careful these days. Apparently, this will work by having Firefox contact some online database to ensure you're not trying to connect to one of the well-known phishing sites.

  • Better RSS support – not only there are Live Titles support for websites which provide microsummary, but there is also a much better general support for RSS feeds. For instance, you can change settings so that Firefox will automatically add feeds to your feeds aggregator (like Yahoo! or Google Reader)


What I don't like about Firefox 2

  • Constantly moving release dates and deadlines – waiting for the Firefox 2.0 b2 beta was really painful, as the release date was pushed forward few times.

  • Very little support for existing extensions.
    While it really is more a task for the extensions developers to provide support for this version of Firefox, I still think some kind of Firefox version emulation  (Firefox 2 pretending to be Firefox 1.5) for the sake of backwards compatibility would be a great option to have

  • Options dialogue window is changed again – don't you just hate it when you have to learn location of all the setting options all over again? It's okay for new functionality, but I don't like the known settings to be regrouped and moved to a different tab.

Overall, I'm very happy to see another option of the most favorite and useful browser, and I hope the final Firefox 2.0 release is to follow soon enough.


If you want to learn more, you can read more about the new features in the Mozilla Firefox 2 Beta 2 Release Notes. If you simply want to download this beta of Firefox 2, please get it here.

Blogging Glossary: Google Sitemaps Definition

I haven't found an easy enough way to highlight the most recent updates to the Blogging Glossary, and so I'll probably be announcing some of the articles there until a better way is found. 

I've just created a page with a definition of Google Sitemaps which I think you may find useful, especially if you're new to this technology. Please have a look here: Blogging Glossary: Sitemap


pS: I'm planning to implement a sidebar plugin which will show a total counter of all the articles in the Blogging Glossary, and will also give a list of the ones most recently created/updated ones. Do you think such a feature will be useful for you? Do you have any other ideas or suggestions? Please let me know! Thanks!

Blogging Glossary Progress

Just wanted to highlight the progress I'm making with the Blogging Glossary. I don't like creating practically empty place holders for various blogging terms, so the rate of growth isn't shocking just yet ;)

Still, there are some articles you can already find useful, especially if you're just getting started with blogging:

If you want these articles updated, please let me know.  Also, if there are some particular blogging terms you'd like me to concentrate on, just mention them in comments to this entry and I'll be sure to cover them first – after all, it doesn't matter what to start with, as I'll try and cover as much as I can.

Blogger Jobs at ProBlogger

Excellent! I've just read an announcement that Darren Rowse has opened up a new service on his ProBlogger website.

This time, it's a job board service, where you'll be able to offer or find a job in blogging. Knowing how popular ProBlogger is, I have no doubts this board will be a success.

WordPress Tutorials by cre8d design

Rachel Cunliffe in her cre8d design blog just posted a wonderful WordPress Quick Screencast Tutorial, Part 1


Part One is a half-an-hour video tutorial showing you how to set up a brand new blog of yours. It covers such topics as downloading the freeware FTP software and using it to upload your WordPress blogging engine to your hosting provider. The tutorial also explains what posts and categories are, and shows you how to quickly create the very first post of yours. There is also quite a number of quick tips on getting started with your WordPress blog.

Well done, Rachel! It's always much better to show how to do something, and I think this 30min video covers what could possibly take pages and pages of online tutorials.


For any of you just thinking of setting a new blog up – this is one video you must watch!

The second part of the tutorial is expected soon, so I'll probably just update this post when it's available for you to download.